Could we ask for a little help from you?

An exhibition garden

I’ve been really surprised at all the positive comments the site has been generating from everyone – Thank you all so much, it’s fun to write, improves my awful spelling, maybe my grammar as well ?

You can let me know on that one !

Some of you asked if I would make it possible to donate on this site, I’ve tried to avoid that, as well as adverts as I was trying to be impartial, with the content.

Growing Trends a new style of garden Show on www.cravingtalkradio.com

As you may know we do have a fun internet radio show, where we interview folks from around the globe about their Gardens & Landscapes.

When we started this radio show the aim was to find interesting people who had a passion for their Garden or Landscapes. Little did we know what would happen. In just a few months we have an audience stretching across the globe in 43 countries.

ww.grotrends.com

We soon added a web site www.grotrends.com to provide details of schedules, information on guests and sponsors, and a growing information area with details of techniques, ideas and examples of projects.

Working to complete an exhibition garden

The show Growing Trends concentrates on the clients, the designers, the creators, the maintainers and the experts that help them, we would welcome any suggestions on who we should contact – the schedule is filling quickly, which brings me on to how you can help.

Note how clean the working area is

We have two one hour shows a day seven days a week, with a little funding help we can update the interviews more often, and tell the story of you, or your friends work, or your garden or landscape.

Can you help us in just a small way ? Contributing just $5 ?

Here’s the link to StartSomeGood   the crowdfunding source we are using for this fund raising campaign

A Japanese style garden exhibition

Growing Trends is fun, friendly, informative, interesting, amusing & entertaining.

A project in Florida

This one acre pond has a water change almost once per hour !

A final interesting project from just outside New York. This fully structural gravity wall is almost 27ft high !

Fully structural timber wall

Note the access is less than 4ft !

We really would appreciate your support, so we can interview maybe you, or your colleagues or friends, across the globe – thank you all for your support & comments.

You can also find us on Facebook 

Ann & Chris.


Hits: 2

Planting plans made easy to use at home!

It’s been 40 years since I first grappled with a traditional planting plan. All those lovely latin names – like Fagus sylvatica,  Fritillaria meleagris, etc.,

Hand drawn

In the drawing office, it was a matter of using a thick graph paper so the electric eraser didn’t make lots of little holes in the paper as we repositioned plants, or corrected the many mistakes or changes in mind. Sometimes we used a plant stamp, then labelled by hand. As you can see interpreting the labels isn’t easy.

The whole process was time consuming, difficult to make into a quality finished drawing.

This next version once CAD was introcuded is a combination of hand drawn and CAD drawn, easier to interpret, but still not easy to set out.

Using CAD system
Using CAD system

On  site, in those days these were cumbersome beasts, usually printed on dyeline, so it was dark, difficult to read with scribblings and such in the margin, fragile, and ruined once wet. Wrapping in plastic sort of helped, cutting into smaller sections then laminating was better..

Checking off plants

Wielding  one of these around on a damp morning picking out the plants, with the planting foreman, and then placing took for ever.

Setting out plants

Trying to mark off those plants you had placed and then moving on to the next batch, with a few areas missing….

For some odd reason even though the nursery managed to price  all the plants, they never seemed to be able to deliver them all to site completely in one go, or even to the company yard, so the whole process was both time consuming, expensive and worse annoying to a client who by now had had enough of three or five members of staff working in what was their space.

I hear a gentle nod of agreement or perhaps sigh of frustration?

It got so bad that we used to change our standard estimate to something like..

” To carefully prepare ground, incorporating peat and fertilizer at each planting station, to supply & plant  in  ‘xxx’ number of flowering & ornamental shrubs, carefully watering in on completion, then applying a 50 mm depth of planting mulch”

Here’s a plan without specifics..in this case a veggie garden area.

An Isometric plant plan.

This gave us a contractual escape clause, but wasn’t what we wanted to portray to our clients. We even tried to restrict the planting selection to plants we knew we could obtain, but designers & clients have pet likes and dislikes being restrained to just a few varieties caused all manner of objections!

We even tried an even more generic look – with areas just designated for planting.

Plan with Artist's Impression

We also found most of our clients actually really wanted to do some of the work themselves, the idea of planting was often the most appealing, as the ground was prepared, the turf laid and all the ‘hard’ structural stuff was completed.  The feeling was that just a bit of planting wouldn’t take long and they could then say ‘we did this ourselves’….

There was one small issue, understanding the ubiquitous planting plan. Setting out plants in the damp, with a tape, scale rule and a large piece of paper was a task best left to the experts.

We solved this problem with our Weekend Planting Grid. A really easy to understand ‘garden bedding system’. Today we even have this simple system patented, it’s even incorporated into one of the more easy to use CAD programs.

Photo Realistic Design

The system cuts setting out times in half, for anyone, acts as a  landscape fabric or paper mulch, reducing weeds and watering and makes the whole process as easy as 1,2,3 ! – costing only marginally more than just a landscape fabric.mulch.

No longer do you need a setting out plan, just a plant position is all that is required.

New style Planting Plan

It makes it very easy to place the plants in position, so now any combination of annual, bulb, corm, perennial, shrub, even tree  can be used with little risk of them being placed incorrectly. In fact there is no need for a planting plan at all ! Just a series of grids will do. The fabric is left to act as a landscape mulch mat, preserving water and reducing weeds, all it requires is a 2 inch layer of mulch to keep attractive.

Setting Out Grid

If you use the CAD program you can design your own arrangement , create them with photorealistic images and then print out their positions. The CAD program automatically generates the grid layouts, positions the plants, prints out a planting position list, even prints out a plant label with position for the plant pots, then generates a quotation and plant care notes – amazing really !

Difficult to set out designs are now easy…

Use four to make a quick 'Knot Garden"

Complicated Herb and Veggie gardens are a breeze. With positions shown on a simple patented grid system.

potager-3b

Even more fun is the simple PicaGardi that you can download and use it’s available on the iTunes store, Google Play and Amazon

We are planning a Growing Trends radio show just about design and designers soon, we would love to hear your comments, suggestions & ideas.

Ann & Chris

Hits: 4

It’s all in the detail !

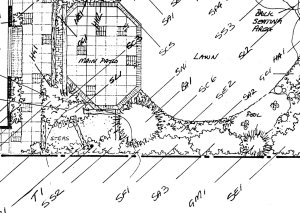
Today, I thought some technical stuff was in order.

I’ll try and make it interesting, no doubt you will let me know ?

I spent almost as much time as a Quantity Surveyor as I did a Landscape Architect & Contracts Manager… the worst part was as you grow a business you have to give up various aspects of the work, allowing others to do it instead.

The secret is always find someone better than you to do the job you are relinquishing…

Then catch them doing it right and praise them, whilst simultaneously stopping them from doing it wrong, without to much rancour.

Quiet garden in Primary School

Some years ago, just after I graduated I found myself working in the minor engineering and technical department for a large London Boroughs Parks Department – today you would be called a Landscape Architect, but in those days the Parks Managers wanted folks with hands on experience. This meant we not only knew how to design, but we also knew how to build and even better we knew how to manage the project, including the labour, right down to the work study times it took to build a specific item. We looked after Schools, Parks, Playgrounds, Golf Courses, Verges, Allotments, Open Spaces, Housing Sites and the odd Airfield.

It's time to re connect with nature

I always wondered why we frantically completed a valuation of work ( right down to the allowed minutes of time each element took) every Monday morning , then rushed the ‘bonus’ sheets over to the treasurers department on Tuesday morning  so the staff could be paid their bonuses on time each Friday – hourly paid staff were paid weekly in England ( us salaried staff were paid monthly, we even worked flexi time with every other Monday off, those were the days as they say !).

In later years these standard minute values that had so painstakingly been obtained turned out to be especially useful when pricing large scale contracts, as they were actual times not  priced rates.

What was more interesting though was they enabled someone to build up a time and thus rate for all manner of projects. So we could accurately figure out how long a BBQ would take to build for instance, or how long 5 tonnes of tarmac would take 3 men to prepare, lay, roll and clean up.

Car Park

When semi automatic pricing came along in the form of access based databases it was easy to ‘plug’ these times into the program to use for pricing projects.

This worked great for projects where you weren’t tendering for a job, as you were usually able to produce a fair price, quickly and accurately.

Saddleback coping with dark mortar.

The projects that went out to tender were much more of a lottery, as depending on who was pricing and why, often dictated how the pricing went… No one minds losing a tender by say 1-2% and if everyone has a similar price. It would suggest that the bill of quantities , drawings and specifications are usually going to be an accurate reflection of the work in hand, without any unforeseen errors.

Exhibition

What is intensely irritating  from a contracting point of view is when you carefully price a project and then lose by more than 15%, I’ve often wondered why during the assessment phase a  tendering body doesn’t add up all the tender values, then divide by the number of tenderers and use that mean figure as the basis for the work – we found that more often than not when we did this in the parks department that was the final cost of the project. I believe the Dutch usually take the second lowest price as this makes it almost impossible to ‘buy’ a job by underpricing !

Street Planter & Paving

One of the early ‘tricks’ we learned, was how to be asked to price the better projects if we eliminated the ‘snagging or punch list’. The client put us to the top of their use list. More often than not our site staff ‘snagged’ as they went along, this saved us so much time we gave them a bonus.

Another trick was to put the projects up for a national award – we were fortunate to receive 17 national awards over the years, they were great for staff moral , even better for our clients who then asked us to price some fabulous projects.

Hand Asphalting

We have always tried to be professional, to do the best job we could for a client, avoiding confrontation as much as possible, sure we negotiate hard, but not too aggressively. – the saying ‘Under promise and over perform’ is a great way to work.

Consistent Pointing

The pointing above is typical of our approach, when it comes to the finish it is essential to maintain a clean consistent finish, it looks good, keeps everyone happy..

The finished raised brick patio

The real pearls of wisdom are ” Quality is remembered long after the price has been paid ”

Have you visited one of your old projects recently?

What did it look like?

Listen to Ann & Chris at Growing Trends 

Hits: 1

From “Concept to Completion” – a complete project!

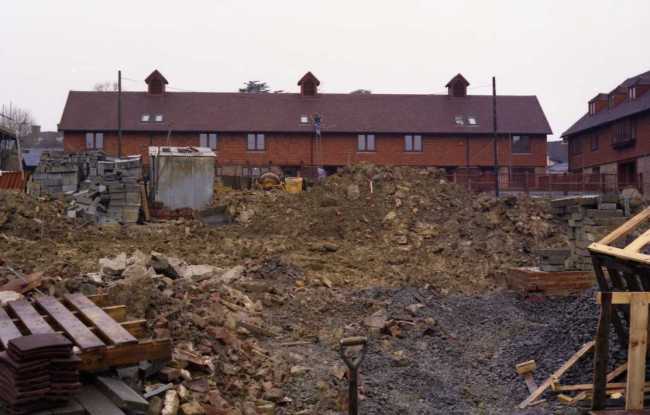
Ever wondered how a landscape project is conceived, designed, planned and then implemented?

Completed Project

We have created quite a few over the years, so we thought we would attempt a trial of one here that we did some years ago.

There is an ulterior motive for this, Ann & I would like to attempt to follow a project  from ‘Concept to Completion’ on our radio show ‘Growing Trends’ 

This project started because the owners, a young couple, were starting a family, and wanted the swimming pool that dominated their back garden removed, partly for safety reasons and partly because as you can see it didn’t leave much space for a user friendly garden.

The Garden Before

The first step was to survey the garden, in this case we needed to take fairly accurate levels to enable us to quantify the amount of work to do.

This has a number of benefits ;-

When working in tight areas , there was only a side gate access, it is very wise to design in such a way as the least amount of material is taken away or brought in to complete a project – all that hauling is wasting the clients budget.

Secondly it is jolly hard to accommodate too much material when the entire site is being worked on.

Here you can see the access restrictions

 With such restricted access the design whilst needing to be imaginative, had to be practical and effective.

So we folded the pool in on itself

The solution was to use the existing access path level as the main level,  demolish the pool surrounds, break out the base of the pool, to allow for drainage, then backfill in layers the excavated  pool , paving and surplus material  to bring the levels up to create a much larger patio.

Enlarged patio

We even salvaged some of  the brick wall to mix in with the new london stocks to create the imposing planter that acts as a statement as you walk around the side of the house to the rear garden.

Planter

The new paving extends all the way around the house to give continuity, we added a stock brick edge to the paving so we could link the low black stained timber retaining walls, the raised patio diaz, and the black stained timber edged step to the rest of the garden.

Brick edged surround

The stained timber edge is protected with polythene sheeting and has a gravel pressure release drain set behind, to prevent water incursion onto the light coloured patio stones, which would stain very easily otherwise.

Much enlarged patio

There is now a much enlarged patio area ideal for young children to play on, which is both safe and secure.

Step detail

The step detail is modulised to provide continuity and ease of use when walking on, planting the edges will over time soften the strong straight lines and allow the planting to seamlessly flow into the step area.

Planting bank

The steep banks are now lost in the planting, supported by the low stained timber wall, creating a feature rather than an aftercare issue as before.

Completed Project

The completed project, is much easier to maintain, has a huge amount of safe space, opens the garden up, into an interesting useable space, for play, entertaining , whilst giving more light to the inside of the house and a feeling of spaciousness.

You can hear Ann & Chris talking to garden owners and the experts that help them on Growing Trends ( just click this link) it will send you to our internet radio show.

If you have an interesting garden or story to tell do drop us a line, we will get back to you in a few days.

We would love to hear from you..

Ann & Chris

Alternatively take a look at our web site at www.grotrends.com it’s packed with helpful hints.


Hits: 7

Why natural materials invariably look superb.

There are a number of reasons why, let’s start with this picture of a French Restaurant not that far from Lyon.

A welcoming French Restaurant

Natural materials, always weather well, they tend not to lose their colours so quickly, being much less affected by UV light. The wood for instance changes colour slowly,  blending into the other colours, with a softer patina. The natural stone stays basically the same colour apart from the addition of dirt and moss etc., the rendering isn’t really natural, it was something started in the 1950’s for some reason in villages throughout France, some have returned to a more natural stone look by hacking the rendering off, others as here have allowed the rendering to weather and blend in.

Of course it helps to have the walls half covered in virginia creeper, with the windows festooned with trailing geraniums. The over all effect is soft on the eye and pleasing.

When selecting materials for a project, it’s always a good idea to see what natural ones are available first.

A selection of natural materials

All the materials in the picture above are ‘natural’  as you can see they have a softer look to them.

They  ‘weather’ in much better and seem to last longer.

Bound Gravel Driveway

This beautiful driveway was constructed with natural bricks to form the rain water gulley run offs – it actually took three bricks to form the channel.

The top wearing surface is a double coated natural dried Pea Gravel that has been applied with fibreglass rovings and a special binder to form an impervious surface. Surfaces like this need to be re applied every 5 years or so to keep up appearances.

The beauty of such a surface is that the gravel isn’t likely to ‘fly around’ much, and the surface lasts longer because it is more or less water proofed.

Gravel and granite path

This attractive Gravel and Granite surface, will basically never change colour, it will always looks warm and inviting, sure it will need some aftercare to keep weeds and encroaching plants at bay, but it will be the same in twenty years time as it is today.

Secret Garden

This secret garden, is really easy to construct, its basically larger gravel rolled into the soil, with stepping stone flat rocks leading to a a stone bench with a small statue acting as the main focal point… a great place to listen to Growing Trends  our downloadable internet radio show.

Small bridge & low rockery


Here we used a low natural stone rockery with a low bridge across a pathway around the garden, as a starting point for an artificial stream, adding differing sized stones and rocks into the stream bed to create a natural appearance.

We will be having an interview  with an ex Head Gardener of one of England’s great Estates shortly.

Do listen to Growing Trends and let us know what you would enjoy hearing about.

Ann & Chris


Hits: 9

Those Opps! moments, never Assume !

Today you can chuckle at my expense !!! Enjoy your weekend !

Water Fall

Designing & Building award winning landscapes has  been a very rewarding, satisfying, fun filled occupation, of course there have been days one prefers to have skipped or passed by, yet more where looking back it was quite amusing now – I’m sure you too have a few you could share with the growing readers too.

So Ann and Chris  are making you an offer you cannot refuse? – well perhaps you can !

Here is the challenge.  If you have an amusing enough incident and you share it here by way of a comment,

Ann & I will call you ( we will have to keep this to an English conversation for now) , we will give you at least 5 minutes to describe in your own words the Opps! moment, you may also give your business a gentle plug!

Hows that ?

So let’s get the ball rolling with some of those Opps ! or “Out take” moments that  have happened to me.

“Hook – Up”

The first that I remember wasn’t actually related to horticulture it was whilst working during a summer recess from college, working as a summer assistant lock keeper, at  Mapledurham, which I think is in Oxfordshire,  as I recall a quite well known movie was being filmed at the time called  “The Eagle has Landed”, just across the reach from the lock.

An example Thames River lock

On this particular day, there was lots of action and noise from the film set, lots of tourist and regular cruisers plying up and down the Thames. The lock is quite large – from memory nearly 200 ft long and about 16ft wide with a 5 ft  rise and fall. Because we were busy we were packing in the boats. Anyway, having filled the lock with boats I opened the sluice gates to let the water out and let the lock water level fall around 5 ft, as this happened I was distracted by the filming. the next minute I turned to see all the boats hooked up with no water beneath! … not a good position to be in !

It took some time to undo the resultant mess….

“Splash”

Client Pool
Client Pool

Sticking to water… one night I was making a visit to a potential client on the way home, it was around dusk, the home owner was a banker, they had a lovely home in Chislehurst, Kent. After a brief talk we took a short stroll around the garden as dusk was fading, it was a long time but it was quite dark by the time we headed back to the house. For some reason, I was talking to the client side by side one moment and the next I was treading muddy water, tearing though a rather decrepit swimming pool cover having missed the dog leg steps on the poolside. The water soon reached my waste, and my suit took on a rather unusual color and smell..meanwhile the client rushed indoors exclaiming I had fallen into the pool, which brought the whole family out giggling !.. somewhat soaking I drove the last 15 miles home. We ended up completing the project, one of the requirements was to break out the miscreant swimming pool !

“Mud Slide”

Lake

On another occasion we were contracted to dredge a small lake and construct a weir. ( a pond is in my definition an area of water in which you can throw a stone over it to land on the other bank. A lake is where the stone falls into the water). So dredging a lake is a task, requiring a variety of big toys… in this case we arranged with the local waterways folks to block ( legitimately) the upper inflow channel, allowing  the water in the lower lake to fall around 8-12 ft which would allow the use of a piece of equipment similar to a dragline. Unfortunately, whilst we knew the plan, the water folks knew the plan and the parks department knew the plan, nobody had told the security guys – who “unblocked’ the upper lake outfall late in the night, thinking some vandal had blocked up the outfalls !

So after about two days of working we returned  in the morning, to find the lake full of water , the equipment  marooned 50 ft out in the lake,with their tracks buried and the mud slowly engulfing the cab.. some drastic action was needed, a very heavy lift truck was used to winch out the equipment, and we changed our method  of removing the silt,to pumping the now slurry into a temporary  lagoon to dry out before carting away.

“An up-lifting experience”

The next was a tad more mundane,  well it started that way at least. We had just completed a large ‘cut & fill’ project covering many tens of acres on a setting out ground for a new power station, we were preparing one area of about 30 acres for seeding when suddenly the bomb squad pulled up, I kid you not…

Here is an English sapper exploring on the site !

Image

Apparently they had been told that a lady across the way ( about 1/4mile, you can see the block in the distance) had just recalled a flight of German bombers had dropped their loads of bombs  in the 2nd world war ,just where we were working  some had failed to explode…Image

so they dug around for a few days, messing up our seed bed and left, when they failed to find any …..

Some ten years later, whilst preparing for the new Queen Elizabeth II, Dartford bridge,  the said 15 or so unexploded bombs were indeed found in the hedge row not 70ft from where the bomb squad had poked around !!!

It was a very useful do not ASSUME moment … you know the meaning  don’t Assume as it makes an  “ASS out of U and ME”

Enjoy the weekend !

Ann & Chris

Hits: 5

From little acorns those A-ha!!! moments.

If only we could all enjoy everyday scenes like this !

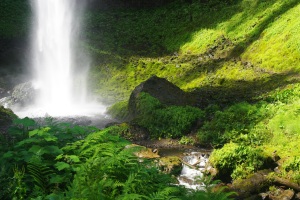
Beautiful landscapes take time, professionalism & commitment, from the owner, the designer, the builder and the maintainer. Unlike almost any other purchase a homeowner can make an external project involves nature, nature has a habit of seeking attention often !

So let’s take a moment to walk into my life as they say.

There is a well known expression ” The customer is always right” – this is very true. It is essential to built the customers trust, and not lose it, for once gone events have a habit of sending everything as we say ‘Pear shaped’ …. so today let’s stay positive and explore experience….

I only know ‘My’ experience, which to be fair has been fairly extensive, fun and over all very enjoyable, with the odd heart stopping moment, which we will discuss later.

My school days, yes ,I was privileged, was Bearwood College, its a beautifully laid out estate. Designed by The Rev Gilpin back in the early 1800’s for John Walters the founder of ‘The Times’,  at school we were expected to do Estate work on the huge grounds – some 500 acres, once a week to help maintain the  appearance of the school around the mansion house. So as a youngster for 2 hours every week we played at aftercare of a huge Estate – I’ve just interviewed a colleague who did this for real as a Head Gardener of a 12000 acre estate, with among other things a 44 acre formal garden, this after years of designing spectacular award winning gardens, it’s a fascinating interview, as the estate is probably the busiest in the world with many events attracting over 100,000 visitors at a time, there is a motor racing and horse racing circuit within the grounds ! – you can hear Alan shortly on Growing Trends  our internet radio show, or you can listen anytime to recorded shows at www.cravingtalkradio.com

Bearwood College

During my vacations to earn additional pocket money for school – the Tuck Shop was stocked with all things fattening, that us kiddies always preferred to real food ! No just kidding.

I worked with a friend in his dad’s business of Forestry – we planted new woodlands in the winter break, did more planting in the spring break, then weeded the newly planted woodlands with a long handled hook in the summer break – it was heavy work but very rewarding, the ploughman’s lunch with a pint of shandy at lunchtime sitting out in a pub garden in the summer was glorious, however toasting your homemade sandwiches over a small twig fire in the depths of winter, cold,soaking wet, drinking peppered hot bovril wasn’t quite the same, especially as your toes were on the verge of frostbite !

 Even the summer days had their own special moments…

“That is  until you came across a wasp’s nest buried in the ground in your row as you cut down the foxgloves, brambles, and other assorted weeds  a swarm of angry wasp’s chased you along your row, which I might add was almost always a vertical hillside !  The really scary one was,  when a pheasant launched itself at you as you almost chopped its head off ! It used to take me a few minutes to calm down from that – you never ever hit the bird, or really saw it, but you sure heard it, and it was a huge blur as it flew past you.!”

After leaving school, working for a year at an Estate Agent’s introducing clients to property investments, I heard about a new landscape course at Merrist Wood College, was accepted, and spent three years really enjoying myself earning a College Degree in the process !

The main house

The course was so good,everyone of us was head hunted way before the course finished, well, now that I come to remember Bill, he had the new MGB sportscar, decided to buy a yacht and sailed off into the yonder, never to be heard of again !

I spend a further three or four years in a London Borough’s parks department learning some serious construction techniques – they called us Landscape technicians. There were six of us, in the group, when four of us left and the fifth joined the ranks of the clergy, one of the original six is still there so Ian must have 43 years of service ! It took almost 12 full time jobs to replace us ! We learned a huge amount, it was a great place to learn, with lots of variety, seriously engineered construction techniques, a dedicated to us work study team, so we knew how long items took to build.

Car Park

It lacked the ability to really expand ones horizons, beyond parks, open spaces & schools,so after three years it was time to move on.

Gravity Wall

Private practice was a completely different place, armed with the knowledge of how to build to an exacting commercial standard – something that held us in very good stead as we built our company, we did something probably unique at that time, we deliberately concentrated on Design and Build we won one award after another, ( currently 17) mainly because we created a standard working method, for our staff, we used standard details that we documented, we loved to experiment with new ideas.


New Ideas...?

No, just kidding this is a planning ‘item’ in Oxford, but I bet you took a couple of looks at it !

One of the first A-ha !!! moments was Dri-lay drives, it happened because a client asked for a brick drive with a dark mortar joint. We duly designed and installed the drive – which took  two men 10 days just to point by hand !. This seemed a waste of potential profit , so recalling our local authority days the next one we tried was with the dri-lay method we had used in parks, the very first project saved us over 50% of the normal time to complete !

Natural brick with mortar joints

One of the design features we added, was a ‘canted’ brick edge,when ever possible this served two purposes, it was visually very attractive, catching the eye, creating a visual movement.

More importantly for the housewife, it was a superb aide memoire when driving onto as if you got too close to the edge the powered steering ‘tweaked’ enough to prevent you from driving into the landscape – this produced lots of customers from recommendations..

Below you see the first ‘dri-lay’ natural brick drive, we used a harder brick at first as the clay bricks tended to snap if you applied too heavy a vibration – after a while we figured using a rubberised mat would alleviate this issue.

The bonus to us, the first drive took 2 weeks to complete, this one was finished inside 4 days !

Dri-lay natural brick drive

I well remember driving  to a large concrete manufacturer of paving and blocks in 1984 and asking for help with our advertising budget – in those days the firms would pay a percentage of your advertising if you mentioned them. Anyway we went up to Derby from London !  gave a presentation on ‘Designer Drives” , it blew them away and we were politely told that the market didn’t exist. – a year later we had 5 crews constantly working building Dry lay drives, so many firms were starting to see the market potential. that we moved up to bricks.

Brindled block paving

By then we offered Block Drives, Brick Drives and for the really discerning Granite Sett drives – I have to say a granite sett drive looks quite exceptional

We also learned a valuable lesson, as we didn’t want to just build drives, we broadened what we offered clients, adding canted brick edges, specially designed recessed manhole covers, multi coloured drives- which then became ‘brindled.’ As the manufacturers caught on.

Canted block edge

Pictures of our drives appeared on advertising brochures from those very companies.

Our next Aha !!! moment was the recessed manhole cover, which we made ourselves at first..

Recessed covers

See if you can see the second one in this picture above! This project was one of the first where we used a specially made stock brick the yellow is the kiln dried sand we used to brush between the interstices.

Inserting recessed cover bricks

and the final result ..

Finished terrace

We designed & built lots and lots of drives…

45 degree herringbone

We learned some valuable time saving lessons, the best looking was always bricks laid 45 degrees from the road direction, they took longer and required much more cutting, so warranted a slightly higher charge, but they almost always looked better.

Natural bricks are not a standard size, so after about 6 ft (1.8m ) of one direction the joints tend to start running out of line so be careful how you set out. Oddly 45 degree herringbone actually helps to hide this visual effect.

Dri-lay brick driveway & entrance gates


I have to admit that it has, and continues to be, an awful lot of fun and enjoyment, not to mention the satisfaction that comes from achieving a well thought out and attractive scheme, or seeing a client years later saying how much they have enjoyed what was done, how well it has lasted.


This granite sett pathway is extremely hard wearing  and yet very rustic looking.

I’ve always adopted a slightly different approach with private clients as I felt that most were not highly conversant with contractual law, or quantity surveying, always striving to give sound , honest advice, and maintain a high quality finish no matter what….

The rose arbor was connected to the house by the pathway.

How is it that some projects just look wonderful and others just ok ?

The answer is in the detail and the finish. 

Pergola and well

There is also no doubt in my mind that, the more experience one has, the greater the ability to be able to produce , not only an award winning scheme, but also to ensure that the design is both workable and economically viable – of course if money is no object ? – I have personally worked on a few projects where money was not part of the equation, oddly they didn’t work out any better than a well designed and thoughtfully implemented scheme.

Some more A-ha !!! moments later , especially as we have grown longer in the tooth, we become smarter and now obtain patents for our “A-ha !! ” moments.

In the meantime do listen to our interviews at Growing Trends or tune in on your iphone or android to Live365 daily at 1pm & 7pm central time, find Craving Talk Radio.

Ann & Chris.


Hits: 5

Growing Trends that have been around awhile….

Let's dance !
Let’s dance !
When Ann & I started  ‘Growing Trends’ the web site, blog and radio show, we weren’t sure how to engage all of you. It seems a little wit, the odd anecdote and should I say a touch of knowledge has helped us enormously.

In a very short time we have built an audience of readers, listeners and fellow Horticulturists, they have come from :-

United States, Canada, Venezuela, Argentina, Columbia, Germany ,United Kingdom, Spain, Ireland, Italy, Hungary, Denmark, Romania, France, Netherlands, Jamaica,Barbados, Egypt, New Zealand, Australia, Malaysia, Japan, India,  Saudi Arabia, South Africa, Republic of Korea,

We are just stunned…  thank you all so much. Please if you have time send us a picture of your favourite space, garden or landscape with a few notes, we would love to hear from you.

Today, as we have a holiday weekend here in the USA, it seems that our blog should be a little in this spirit, so I’m going to try and find a bunch of pictures of projects we’ve completed along with pictures of unusual items used in the urban landscape that perhaps some have not seen before.. hope you enjoy them..

So let’s start with a really big tree being  moved, it was one of many on this site, weighing some 600 tons and approximately 60ft tall!

Really it's that large !

One of my favorites a flower clock in Geneva, Switzerland.

Geneva, Switzerland
Geneva, Switzerland

This one was ‘snapped’ in Amsterdam, it’s an old cannon, now serving as a vehicle bollard !

An old cannon being used as a bollard

The next is fairly common – creating a bubble fountain using an old natural millstone wheel.

Original granite millstone fountain

This method completely softens a brick pier and makes it look ageless – we used a single canted brick on each corner, and added a double layer of tiles ‘Creasing Tile’ before the soldier course, the resultant ‘shadow line creates interest and helps the wall to ‘weather’ much better.

Brick Pier with creasing tile

This one is much harder to do, it’s a circular patio of natural setts – they tend to be slightly different sizes. When laid like this, in a circular pattern creates a feeling of movement and space, in what is a fairly small area.

Small setts laid in a radiating pattern

When you have a natural random wall it is always hard to create a ‘finish’   , we solved this by bonding a brick coping to match the drive brick edge.

Brick Coping Course
Brick Coping Course

What is really interesting is, if you look really carefully you can see the brick coping running into the driveway as the wall ends, this looked so good, the red tarmac ( which is quite expensive) helps with the overall effect.

Driveway
Driveway

Many years ago, we needed to find away to create ‘Raised planters’ on a roof that were exceedingly light weight, contained and yet attractive. We think we succeeded with these specially made by us artificial rock faced grp planters. – we won an award for the project , which was fun !

Artificial Rocks
Artificial Rocks

Some 30 years ago we started building gravity walls with ‘TimberGrid’ , then we thought let’s add some plants, it worked great..!

Treated Structural Green Wall

It wasn’t long before they started to ‘Grow’ well you know if you try hard enough it becomes a ‘Trend ‘

Tall timber gravity wall

Sometimes it’s fun to experiment, so here we came up with a ‘curved’  wall

Creating movement
Creating movement

Finally a simple picture on a very clear day !

Looking Up
                       Looking Up

Hope  you have enjoyed,  do drop us a line

or visit our website at www.grotrends.com

or listen to our internet radio show  Growing Trends

Ann & Chris


Hits: 3

Growing Trends

I thought it would be fun to share with you, our interview schedule.

We are on air at 1pm & 7pm daily at www.cravingtalkradio.com or you can download as a podcast for later listening.

Our first interview was with Belinda & Terry, this is their lovely garden.

Image

and a more romantic version, the pool is so inviting….

belinda impressionist

and the famous ‘Zen’ deck, now sanded and restored to its glory…

belinda zen deck

Our next interview was with John Stanley of John Stanley Associates in Australia, we didn’t talk about his garden as it’s a tad larger than most as you can see – what a view !

2013-11-15 18.45.34 HDR

294860_10150354211758767_8130765_n

What we did talk about was trends in edibles  and concerns over  bees, you can hear both on Craving Talk Radio.com, we are due to revisit John in Perth again shortly.

Image

Coming up soon is :-

Kelly Daniels lovely garden,

kelly Gallery garden

and here is some of her superb photography.

Image

Then we have:

Dwayne Hoover the Horticulturist at the  Kauffman Memorial Garden in Kansas City we caught up with Dwayne early one morning – 6am to be precise, the team was starting to put together the summer bedding.

Image

Then it’s Jenny’s turn  and her Fairy Room at the Celtic Ranch along with ‘Half-pint McGee’, who will soon be your little heart throb…….

Image

Then it’s the turn of the Nelson Atkins Museum in Kansas City,

IMGP6042

and the lovely sculpture park. You have to be strong to play badminton here !

IMGP6040

and my favorite the Henry Moore collection…

IMGP6031

this next amazing sculpture is some 56ft tall..

IMGP6018

to read more about our rather different programs visit www.grotrends.com

[polldaddy poll=8159522]


Hits: 4

When weather plays a part

As it seems for some of us climate change is playing havoc with our normal weather – for some way too much rain, others nowhere near enough and yet others both but at the wrong times along with huge temperature variations. I thought it might be an idea to show you some projects that eventually turned out quite well despite the conditions we encountered during construction.

The thing to remember is, that they took longer to complete, longer to establish and usually they cost much more because the folks building them could only work in short time sections.

This first project was constructed on very heavy wet clay, here is the site as we saw it when we started work.

Image

here is the site after we have been working a little while. Almost ready to put the finishing planting, turfing in etc,.

Image

Here, during an inspection, the plants have established and the grass is growing well, you would never know how bad the conditions had been. Happily this project won a number awards for us.

Image

This next site was similar… in this case we recommended the owner take a few long weekends away, whilst the garden looked so bad, actually we also wanted the housebuilder to leave so we could apply a finished landscape, without him running equipment over the finished work.

Image

and so it slowly took shape..notice it’s somewhat tidier looking..

Image

The trick is to let the ground dry out, drain where necessary, and what ever you do, do not over compact the sub surface where planting and lawns are due to be.Also as soon as possible get the site clean and tidy and keep it that way, the client usually has had enough after about week 8 of these very distressing looking pictures., fortunately In the end it looked just like any other project.

Image

perhaps nicer than some..

Image

We found that if management spent a little extra time with the client in these situations, it wasn’t long before the project was back on course, with a happy client and a happy workforce.

Hits: 8